X1 Control Panel Expert Mode Overview


Profile Settings and All Mappings
The main section of the Expert Mode is split into two sides, on the left, you can access the settings that will be activated when you switch to a profile, or select which input you wish to edit. Your chosen input will then be displayed on the right side of the Window along with its current outputs.
Profile Settings
At the top left of this section is the "Profile Settings" button. The settings and outputs accessed here will be applied as soon as this profile is set as active.
DPI(Pointer Speed)
The first setting available under this heading is DPI or "Dots Per Inch". This setting defines how far your cursor will move for every inch your Z moves, so increasing this value will increase your pointer speed.
DPI Levels
On the right side of the DPI Slider you can add DPI levels. These are useful if you want to be able to quickly switch between two or more different DPI values within the same profile.
With multiple DPI levels enabled you will also have access to the "Separate X and Y DPI levels" checkbox at the bottom right of your DPI settings. With this you can set vertical and horizontal sensitivity independently.
Once you have created a new DPI level you can then add an output to any of your Zs buttons or inputs that will switch to this DPI level, or cycle through all of your DPI levels.
Lift off Height
This setting adjusts the distance from your mouse mat the Zs optical sensor will stop tracking movement. As the sensor will still track even if your mouse is not touching the mouse mat at all.
The actual distance of the lift of height will vary depending on your mousing surface. But the maximum setting will add and extra 1mm (0.04") compared to the minimum.
Joystick Output
The setting either enables or disables the Zs DirectInput joystick outputs.
Logo Backlight Mode
This setting allows you to adjust the colour of the RGB logo on the Z. There are three different modes available.
Hue Rotation is the default setting and will smoothly cycle the logo backlight through the full spectrum of colors available.
With "Fixed Color" selected, click the colored square that appears next to it, then use the color picker, RGB sliders, or a hex value to set a specific color for your Zs logo.
OLED Mode
This option sets what will be shown on the OLED screen while in this profile.
Tilt Auto-Zeroing
"Tilt Auto-Zeroing" is a firmware feature of the Z which works to prevent the gyroscope's tilt readings from drifting over time. In general it does its job well; but in some use cases it can cause more problems than it solves.
So if you find that you are frequently needing to re-calibrate your tilt angles for your tilt functions to work correctly, try disabling this feature from the profile settings screen.
Just note that since disabling "Tilt Auto-Zeroing" will mean that your Z is not trying to auto-correct for the natural drift in the gyroscope, your tilt values will drift over time. But this drift will be slow, so doing a manual re-zero (with the default right trigger pull function on the global profile, or your own custom mapping) should mean you don't have any problems with tilt for even an extended gaming/work session.
Auto-Release Outputs
By default there is a fail-safe enabled in the Zs firmware which prevents keys from being left held down if the Z is not currently processing any user input. So a press output will automatically release if the Z is not tilted, no buttons are physically held down, and no macros are running.
This means that if you accidentally forget to add a release for one of your press outputs, the key won't be stuck down permanently, which is generally a good thing. However, it is a problem if you actually want a key to be left held down after you release a button.
For example, the mapping below which starts holding down 'A' when you first press the Left Fingertip button, then releases it when you press it again will not work correctly with the Auto-Release fail-safe enabled.
So if you want to make use of these kinds of functions in any of your profiles. Just disable the "Auto-Release Inputs" setting.
If you do just make sure that all of your press outputs have releases, or they will remain stuck down until you change profiles, or reconnect the mouse manually.
Custom Outputs
Below these five standard profile settings you can add your own custom outputs that will trigger as soon as you enter this profile.
A simple example of this is the OLED Flash "Current Profile" output, which is included with the default global profile.
This particular output is very useful when switching profiles with config mode, or any custom profile switch mappings you create. As it means the name of the profile you switch to will be displayed for a few seconds regardless of what you currently have your OLED screen set to output. Without this, you would need to look at the Control Panel to be sure which profile you had changed to.
All Mappings
The All Mappings page displays every custom mapping assigned to your selected profile. You can filter this list by selecting a specific input to view from other buttons and the mouse image on the left side of the Control Panel.
Input Selection
On the left side of Expert Mode's window is an image of the Z, which can be used to select individual button inputs.
If you move your cursor over this image, you will see that all 11 visible buttons can be outlined in yellow. Simply click any one of these to view their complete input and output mappings of the right side of the screen.
Tilt Inputs
Underneath the Z image you can find the Zs Tilt mappings. These are split into two sections, one for left and right tilts, and the other for forward and back.
Threshold/Toggle
The first type is activated and deactivated at a set angle of tilt in a particular direction.
If you click one of these (e.g. "Tilt Left 1.2°), you will be presented with two values to customize.
Angle
This value is simply the angle you will need to tilt the Z in the defined direction for this output to activate. It can be adjusted either by dragging the slider or entering a value in degrees directly.
For outputs you want to trigger without lifting the Z, or using the "FlightStick Extender" use an Angle between 1.0° and 2.0°.
Alternately for outputs you want to trigger while the mouse is lifted off the mouse mat use angles greater than 3.0°. As any tilt output below 3.0° will be ignored while the Z is lifted off the mouse mat. This does not apply to the "FlightStick Extender" however.
Noise Level
The Noise Level value is subtracted from the Angle value to determine when the return output will trigger.
For example the default 1.2° inputs have a noise value of 0.5°, which means that the output will trigger when you tilt to 1.2°, but only release once you have moved back to 0.7°.
This difference in activation and deactivation angles is necessary; as if they were both the same it would be possible for slight fluctuations in the tilt sensors to trigger a tilt output multiple times in quick succession.
Analog
The Analog tilt output will be below all of the other tilt outputs. This output type allows you to map your Zs tilt input to an analog joystick output. Either as one of the main sticks axes, or a slider.
If you click an analog input (e.g. Analog Left/ Right -8° to 8°) you will see a slider with two values that allow you to adjust the analog sensitivity and "deadzone" of this input.
Max
The Max value sets how far you will need to tilt the Z to max out this input, so the equivalent of pushing a joystick all the way in one direction. The default value of 8° for left/right tilt is approximately the range of movement you will have access to while using the "FlightStick Extender".
Min
Increasing the Min value from 0° will create a "Dead-Zone" where the tilt outputs will be ignored. For example settings this to 2° would mean that your joystick output will not start moving until you pass 2°, rather than starting right at 0°.
An example of where this would be useful is if you are using the analog output to steer a vehicle. Without a dead-zone in place it could be difficult to travel in a straight line while you are doing other things with your mouse. As any slight movement from the tilt sensors could steer you off course.
Deep Click Inputs
Deep Click inputs are available on five of the Z's mouse buttons, the three main mouse buttons, plus two fingertip buttons. They allow you to add multiple sets of outputs to a single button. Which can either be triggered in a sequence whose speed depends on how quickly you apply pressure to the button. Or you can configure a deep click to only trigger one of several possible outputs depending on how hard you press before releasing. Finally, you can use them to control an analog joystick output.
Deep Click inputs are available on five of the Z's mouse buttons, the three main mouse buttons, plus two fingertip buttons. They allow you to add multiple sets of outputs to a single button. Which can either be triggered in a sequence whose speed depends on how quickly you apply pressure to the button. Or you can configure a deep click to only trigger one of several possible outputs depending on how hard you press before releasing. Finally, you can use them to control an analog joystick output.
Adding a Deep Click
Deep click inputs will be included by default in any profile you create. Just select one of the deep click enabled buttons and you will see a deep click nested inside the button.
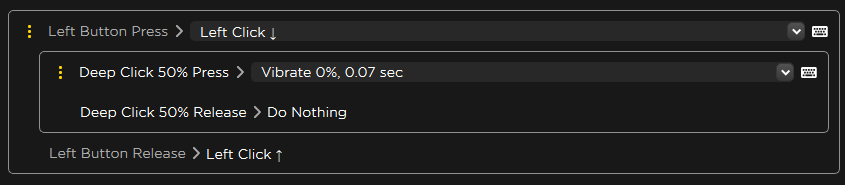
By default, a deep click will include a 0% strength vibration. This can be removed, but often you will want to add vibration feedback so you can feel when your deep click activates.
Adding an extra Deep Click level
To add an additional Deep Click level, click the  button next to a base deep click-enabled input. This will open the prompt below where you can adjust the settings for you new deep click.
To add an additional Deep Click level, click the button next to a base deep click-enabled input. This will open the prompt below where you can adjust the settings for you new deep click.
User Input
When adding a deep click, this needs to match the button you are adding it to. For example, if you are adding an extra Deep Click level to the "Left Fingertip Button", "Left Fingertip Button Force" should be selected here. If anything else is selected, it will not work. The correct input will be selected by default, so don't change this to anything else unless you know what you're doing.
Related Articles
Introduction to the Swiftpoint X1 Control Panel
Intro The X1 Control Panel provides an easy-to-use interface for configuring mice in our Classic-grip Range. These include: Z, Z2 and Z3 Creator Tracer Installing the X1 Control Panel If you do not already have it installed, it is available for macOS ...Swiftpoint X1 Control Panel - Changelog
Latest Version 3.0.9.1 - May 2026 Improvements & Fixes: Allow access to all pre-made profiles from all mouse models. Allow adding vibration to all input types in simple mode. Use ↑ and ↓ symbols for mouse press and release outputs on mappings screen. ...Swiftpoint X1 Control Panel Beta Changelog
3.1.0.76 Beta New Control Panel Features: Allows re-arranging and saving of mappings from simple modes show all view. Note that some mappings can't be moved (RGB, OLED, DPI). Warnings are displayed when swapping mappings between incompatible inputs, ...X1 Control Panel Experimental Linux Version
Disclaimer: Linux is not an officially supported platform. This release is experimental, so comes with no guarantee that it will work on your system, or that it will receive further updates. This release has not gone through full production testing ...Swiftpoint X1 Control Panel UI - Side Panel
In the side panel you can access the main menu via the cog icon. Links to helpful information like this page via the info icon. And mouse memory usage via the mouse icon. Main Menu Save Mappings to Permanent Flash Memory in Mouse By default the ...